After Receiving an ITA: Your Complete Next Steps Guide

Congratulations! Receiving an Invitation to Apply (ITA) for Canadian permanent residence through Express Entry is a significant milestone in your immigration journey. This comprehensive guide will walk you through every step you need to take after receiving your ITA, ensuring you submit a complete and successful application within the required timeframe.
An ITA is a formal invitation from Immigration, Refugees and Citizenship Canada (IRCC) to apply for permanent residency, issued to candidates who have been selected from the Express Entry pool based on their Comprehensive Ranking System (CRS) score.
This invitation grants you the opportunity to submit an electronic Application for Permanent Residence (eAPR), but it comes with strict deadlines and requirements that you must meet to secure your permanent resident status.
Understanding Your ITA and What It Means

When you receive an ITA, you’ve successfully passed the first major hurdle in Canada’s merit-based immigration system. The ITA confirms that the Canadian government recognizes your potential for success as a new immigrant and believes you can contribute to Canada’s economy and society. However, receiving an ITA is not a guarantee of permanent residence – it’s simply permission to submit your formal application with supporting documentation.
Your ITA will contain crucial information including your CRS score at the time of selection, the program under which you were invited (Federal Skilled Worker, Canadian Experience Class, or Federal Skilled Trades), and most importantly, your submission deadline. You have exactly 60 calendar days from the date you receive your ITA to submit your complete eAPR application, and this deadline cannot be extended under any circumstances.
Your Complete Post-ITA Checklist
To ensure you don’t miss any critical steps, use this comprehensive checklist to track your progress through the entire post-ITA process.
This checklist organizes tasks by priority level and timeline, helping you focus on the most critical items first. Print this checklist and update the status column as you complete each task to maintain momentum and ensure nothing is overlooked.
| Phase | Task | Deadline/Timeline | Status | Priority |
|---|---|---|---|---|
| Initial Steps | Accept ITA in your Express Entry account | Within 3 days of receiving ITA | ☐ Not Started | HIGH |
| Initial Steps | Review your Express Entry profile for accuracy | Within 1 week | ☐ Not Started | HIGH |
| Initial Steps | Download and read the instruction guide | Within 1 week | ☐ Not Started | MEDIUM |
| Initial Steps | Create a document collection timeline | Within 1 week | ☐ Not Started | MEDIUM |
| Document Preparation | Obtain medical exams for all family members | Book within 2 weeks, complete within 6 weeks | ☐ Not Started | HIGH |
| Document Preparation | Apply for police clearance certificates | Apply within 2 weeks (allow 2-12 weeks) | ☐ Not Started | HIGH |
| Document Preparation | Gather employment reference letters | Within 3 weeks | ☐ Not Started | HIGH |
| Document Preparation | Collect educational documents and transcripts | Within 2 weeks | ☐ Not Started | MEDIUM |
| Document Preparation | Prepare proof of funds documentation | Within 1 week | ☐ Not Started | HIGH |
| Document Preparation | Take passport photos for all family members | Within 1 week | ☐ Not Started | LOW |
| Document Preparation | Translate non-English/French documents | Allow 1-2 weeks per document | ☐ Not Started | MEDIUM |
| Document Preparation | Scan all documents in required format | Within 55 days | ☐ Not Started | HIGH |
| Application Submission | Complete eAPR application online | Days 55-60 | ☐ Not Started | CRITICAL |
| Application Submission | Upload all supporting documents | Days 55-60 | ☐ Not Started | CRITICAL |
| Application Submission | Pay government fees | Days 55-60 | ☐ Not Started | CRITICAL |
| Application Submission | Submit application before 60-day deadline | By Day 60 (FIRM DEADLINE) | ☐ Not Started | CRITICAL |
| Post-Submission | Monitor application status online | Weekly check | ☐ Not Started | MEDIUM |
| Post-Submission | Respond to any IRCC requests promptly | Within IRCC timeframe | ☐ Not Started | HIGH |
| Post-Submission | Wait for decision (5-6 months) | 5-6 months | ☐ Not Started | MEDIUM |
| Final Steps | Receive COPR (if approved) | Before COPR expiry | ☐ Not Started | HIGH |
| Final Steps | Complete landing process in Canada | Before COPR expiry | ☐ Not Started | HIGH |
| Final Steps | Apply for PR card and SIN number | Within 30 days of landing | ☐ Not Started | MEDIUM |
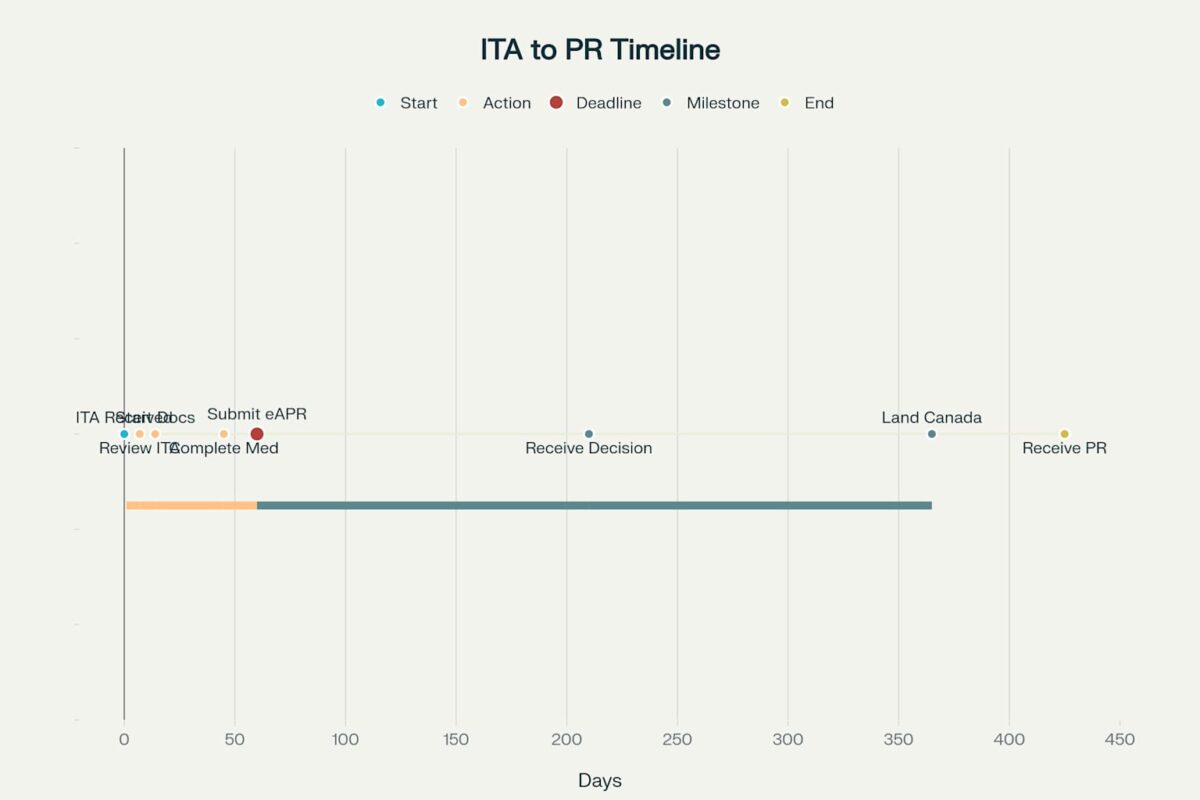
The Critical 60-Day Timeline
The 60-day deadline is one of the most important aspects of the post-ITA process. IRCC reduced this deadline from 90 days in 2018 to ensure faster processing and maintain the integrity of the Express Entry system. Missing this deadline means your ITA will expire, and you’ll need to create a new Express Entry profile and wait for another invitation if you want to continue with your immigration plans.
The timeline breakdown shows that you should begin document collection immediately, as some documents like police clearance certificates can take 2-12 weeks to obtain. Medical examinations must be booked within the first two weeks and completed within six weeks to ensure results are available before your submission deadline.
Immediate Steps After Receiving Your ITA
Step 1: Accept Your ITA (Within 3 Days)
Log into your Express Entry account and formally accept your ITA. This action starts your 60-day countdown and confirms your intention to proceed with the permanent residence application.
Step 2: Review Your Profile Thoroughly
Before proceeding, carefully review all information in your Express Entry profile to ensure accuracy. Any discrepancies between your profile information and supporting documents can lead to application refusal or misrepresentation charges, which can result in a five-year bar from entering Canada.
Step 3: Download the Instruction Guide
IRCC provides a comprehensive instruction guide specific to your immigration program 10. This document contains detailed requirements for each supporting document and explains how to complete your eAPR application.
Step 4: Create Your Document Collection Plan
Organize your document collection based on processing times and complexity. Start with documents that take the longest to obtain, such as police clearance certificates and medical examinations.
ITA Document Checklist
| Document Category | Document Name | Required For | Validity Period | Processing Time to Obtain | Estimated Cost (CAD) |
|---|---|---|---|---|---|
| Identity Documents | Valid Passport/Travel Document | Principal + Family | Must be valid 6+ months | 2-6 weeks | $120-200 |
| Identity Documents | Birth Certificate | Principal + Family | No expiry | 1-4 weeks | $20-50 |
| Identity Documents | Photographs | Principal + Family | Recent (6 months) | 1-2 days | $15-30 |
| Language Proficiency | IELTS/CELPIP Results | Principal + Spouse | 2 years from test date | 13-16 days | $319 |
| Language Proficiency | TEF/TCF Results (if applicable) | Principal + Spouse (French) | 2 years from test date | 6-8 weeks | $400-600 |
| Education | Educational Credential Assessment (ECA) | Principal | 5 years from issue date | 20-25 business days | $200 |
| Education | Official Transcripts | Principal | No expiry | 2-4 weeks | $50-100 |
| Work Experience | Employment Reference Letters | Principal | No specific expiry | 1-2 weeks | Free |
| Work Experience | Pay Stubs/Contracts | Principal | Recent preferred | Immediate | Free |
| Medical | Medical Examination Results | Principal + Family | 1 year from exam date | 1-2 weeks | $300-500 |
| Background Check | Police Clearance Certificates | Principal + Family (18+) | Varies by country | 2-12 weeks | $50-200 |
| Financial | Proof of Funds | Principal | Must be current | 1-2 days | Free |
| Family Documents | Marriage Certificate | If Married | No expiry | Immediate if available | $20-50 |
| Family Documents | Divorce Certificate (if applicable) | If Previously Married | No expiry | Immediate if available | $20-50 |
| Family Documents | Children’s Birth Certificates | If Children | No expiry | Immediate if available | $20-50 |
| Additional Documents | Provincial Nomination (if applicable) | PNP Applicants | Check certificate validity | Already received | Free |
| Additional Documents | Letter of Explanation | As needed | No expiry | 1-2 days | Free |
Essential Document Preparation Guide
Your application’s success depends largely on providing complete and accurate supporting documentation. The required documents verify the information you provided in your Express Entry profile and demonstrate your eligibility for permanent residence.
Core Identity Documents
Every applicant must provide a valid passport or travel document with at least six months of remaining validity 10. If your passport expires within six months of your application submission, you should renew it immediately and update your application with the new information.
Birth certificates are required for all family members included in your application, and recent passport-style photographs must be provided for each person. These photographs must meet IRCC’s specific requirements regarding size, background color, and composition.
Medical Examinations
All applicants and their family members, regardless of whether they’re accompanying you to Canada, must undergo medical examinations by an IRCC-approved panel physician. The medical exam includes physical examination, laboratory tests, and chest X-rays to ensure you don’t pose a health risk to Canadians and won’t place excessive demand on Canada’s healthcare system.
Medical examination results are valid for one year, so you should complete these examinations as soon as possible after receiving your ITA. The panel physician will provide you with an IMM 1017B Upfront Medical Report form and an information printout, both of which must be submitted with your application.
Police Clearance Certificates
You must obtain police clearance certificates from every country where you’ve lived for six months or more since turning 18. These certificates demonstrate that you don’t have a criminal record and aren’t a security risk to Canada.
Processing times for police certificates vary significantly by country, ranging from a few weeks to several months. Some countries require you to be physically present to apply, while others accept applications by mail or through representatives.
Employment Documentation
Employment reference letters are crucial for verifying your work experience claims. These letters must be written on company letterhead, signed by your supervisor or HR representative, and include specific information about your job duties, employment dates, salary, and hours worked per week.
Pay stubs, employment contracts, and tax documents can serve as additional supporting evidence for your work experience claims. Ensure all employment documentation clearly shows your name, the employer’s information, and the relevant time periods.
Application Submission Process
The final phase of your 60-day timeline involves completing and submitting your eAPR application. This process typically requires 5-7 days if all your documents are prepared and organized properly.
Completing Your eAPR
The online application mirrors the information from your Express Entry profile but requires additional details about your background, education, work experience, and family members. You’ll need to upload digital copies of all supporting documents in the formats specified by IRCC.
Document Upload Requirements
All documents must be scanned in clear, high-resolution format and saved as PDF files. File names should be descriptive and organized logically to help IRCC officers review your application efficiently. Each document category has specific requirements for file size and naming conventions.
Fee Payment
Government processing fees must be paid at the time of application submission. These fees are non-refundable regardless of your application outcome, so ensure your application is complete and accurate before paying.
Complete Cost Breakdown
Understanding the financial requirements of the post-ITA process helps you budget appropriately and avoid unexpected expenses.
| Fee Category | Item | Cost (CAD) | Required For | When to Pay |
|---|---|---|---|---|
| Government Fees | Principal Applicant Processing Fee | $950 | All Applications | With eAPR Submission |
| Government Fees | Spouse/Partner Processing Fee | $950 | If Applicable | With eAPR Submission |
| Government Fees | Dependent Child Processing Fee | $260 | If Applicable | With eAPR Submission |
| Government Fees | Right of Permanent Residence Fee (RPRF) – Principal | $575 | All Applications | With eAPR Submission |
| Government Fees | Right of Permanent Residence Fee (RPRF) – Spouse | $575 | If Applicable | With eAPR Submission |
| Government Fees | Biometrics Fee | $85 | Most Countries | With eAPR Submission |
| Required Documents | Medical Examination – Adult | $300-500 | Principal + Family | Before Medical Exam |
| Required Documents | Medical Examination – Child | $200-300 | If Children | Before Medical Exam |
| Required Documents | Police Certificate (varies by country) | $50-200 | Principal + Family | When Applying for Certificate |
| Required Documents | Passport Photos | $15-30 | Principal + Family | When Taking Photos |
| Required Documents | Document Translation | $50-150 per document | Non-English/French docs | When Getting Translation |
| Required Documents | Educational Credential Assessment (ECA) | $200 | If Education Outside Canada | Before ECA Process |
| Required Documents | Proof of Funds Bank Statement | $25-50 | All Applications | When Requesting Statement |
| Language Tests | IELTS General Training | $319 | If Needed | When Booking Test |
| Language Tests | CELPIP General | $280 | Alternative to IELTS | When Booking Test |
| Optional Services | Immigration Consultant/Lawyer | $2,000-5,000 | Optional | As Per Agreement |
| Optional Services | Document Courier Services | $50-100 | Optional | When Shipping |
| Optional Services | Travel Insurance | $100-300 | Optional | When Purchasing Policy |
The total cost varies significantly based on your family size and circumstances. A single applicant typically spends between $2,500-$3,000 CAD, while a family of four may spend $5,500-$6,500 CAD when including all government fees and required documents.
Government fees represent the largest expense category and include processing fees for each family member plus the Right of Permanent Residence Fee (RPRF). The RPRF is paid upfront but is refundable if your application is refused.
Post-Submission: What to Expect
After submitting your eAPR, IRCC begins processing your application according to their standard timeline of 5-6 months for most Express Entry applications. Current processing times show that most applications are completed within this timeframe, with some being processed faster depending on application complexity and volume.
Application Status Monitoring
You can monitor your application status through your IRCC secure account. The system provides updates when IRCC begins reviewing your application, requests additional documents, or makes a final decision.
Responding to IRCC Requests
IRCC may request additional information or documents during processing. These requests typically provide 30-60 days to respond, and failure to respond within the specified timeframe can result in application refusal.
Interview Requirements
Most Express Entry applications are processed without requiring an interview. However, IRCC may request an interview to verify information or clarify details about your application.
After Approval: COPR and Landing Process
If your application is approved, you’ll receive a Confirmation of Permanent Residence (COPR) document. The COPR confirms your approval for permanent residence and provides instructions for completing your landing process in Canada.

COPR Validity and Travel Requirements
Your COPR is typically valid for one year from the date of your medical examination or until your passport expires, whichever comes first. You must land in Canada before the COPR expires, as extensions are not possible.
If you’re outside Canada, you’ll also receive a permanent resident visa (if required based on your nationality) that allows you to travel to Canada. If you’re already in Canada, you’ll complete your landing process through IRCC’s online portal without needing to leave the country.
Landing Process
For applicants outside Canada, landing involves presenting your COPR and other required documents to a Canada Border Services Agency (CBSA) officer at your port of entry. The officer will verify your identity, confirm your application details, and officially grant you permanent resident status.
Applicants already in Canada complete their landing through IRCC’s Permanent Residence Portal, where they confirm their status electronically and provide information for their PR card application.
PR Card Application
Your first PR card is automatically processed once you complete the landing process 25. You don’t need to submit a separate application, but you must provide a Canadian mailing address where IRCC can send your card. PR cards typically arrive within 2 months of completing the landing process.
Common Mistakes to Avoid
Learning from others’ experiences can help you avoid costly errors that could delay or derail your application.
Profile Information Errors
The most serious mistake is providing inconsistent information between your Express Entry profile and supporting documents. Always verify that dates, job titles, educational credentials, and personal information match exactly across all documents.
Document Quality Issues
Poor document quality, missing translations, or incomplete reference letters are common reasons for application delays or refusals. Ensure all documents are clear, complete, and meet IRCC’s specific requirements before submission.
Missing Deadlines
Underestimating the time required to collect documents or complete your application can result in missing the 60-day deadline. Start your document collection immediately and maintain a detailed timeline to avoid last-minute rushes.
Insufficient Proof of Funds
Proof of funds requirements are updated annually, and submitting outdated amounts or insufficient documentation can lead to refusal. Verify the current required amounts on IRCC’s website and ensure your funds meet all requirements for availability and source documentation.
Conclusion: Your Path to Canadian Permanent Residence
The post-ITA process represents the final phase of your Express Entry journey, requiring careful planning, attention to detail, and strict adherence to deadlines 1. While the 60-day timeline may seem challenging, proper preparation and organization make it entirely manageable for most applicants.
Remember that receiving an ITA puts you among the highest-ranked candidates in the Express Entry pool, demonstrating that Canada wants you as a permanent resident 3. By following this comprehensive guide, maintaining organized documentation, and meeting all requirements, you’re well-positioned to successfully complete your application and begin your new life in Canada.
The investment of time and resources in the post-ITA process leads to one of the world’s most valuable immigration outcomes: Canadian permanent residence with a clear path to citizenship. Stay focused on your goal, follow the established timelines, and soon you’ll be celebrating your success as Canada’s newest permanent resident.


