From PR to Citizen: Complete Timeline and Process

Congratulations on taking the next step in your immigration journey! Moving from Permanent Resident (PR) status to full citizenship is an exciting milestone that opens new doors and provides additional security.
This comprehensive guide will walk you through everything you need to know about the citizenship application process, from initial eligibility to taking your oath of allegiance.
Whether you’re in the United States, Canada, Australia, or another country, this guide covers the essential steps, timelines, costs, and requirements to help you navigate the path to citizenship successfully. We’ll break down complex processes into simple, actionable steps that anyone can follow.
Overview: What Does It Mean to Become a Citizen?
Becoming a citizen means you’re making a permanent commitment to your new country. Unlike permanent residency, citizenship typically cannot be revoked (except in cases of fraud), and it comes with additional rights and responsibilities:
Key Benefits of Citizenship:
- Voting Rights: Participate in federal, state, and local elections
- Passport Power: Travel freely and get consular protection abroad
- Family Sponsorship: Bring family members to your country more easily
- Government Jobs: Access to federal employment and elected office
- No Renewal Requirements: Unlike PR cards, citizenship doesn’t expire
- Ultimate Security: Protection from deportation (in most circumstances)
Additional Responsibilities:
- Jury duty (where applicable)
- Potentially military service (varies by country)
- Upholding democratic values and laws
- Potential tax obligations regardless of residence location
Global Citizenship Requirements Comparison
Different countries have varying requirements for citizenship. Here’s how the major immigration destinations compare:


Citizenship application processing times vary significantly by country, from 5.5 months in the US to 12 months in Singapore
| Country | PR Requirement | Physical Presence | Test Required | Processing Time | Application Fee |
|---|---|---|---|---|---|
| United States | 5 years (3 if married to citizen) | 30 months out of 5 years | Yes (English + Civics) | 5.5 months | $710 online / $760 paper |
| Canada | 3 years out of last 5 years | 1,095 days minimum | Yes (ages 18-54) | 10 months | CAD $649.75 adult |
| Australia | 4 years total (1 year as PR) | Max 12 months absence in 4 years | Yes (under 60) | 6-12 months | AUD $575 |
| Singapore | 2 years minimum | Not specified | No | 12 months | Not specified |
| United Kingdom | 5 years indefinite leave | Max 450 days absence in 5 years | Yes (Life in the UK) | 6 months | £1,735 |
The Complete US Citizenship Process: Step-by-Step Guide
The United States has one of the most detailed citizenship processes. Here’s the complete timeline from start to finish:
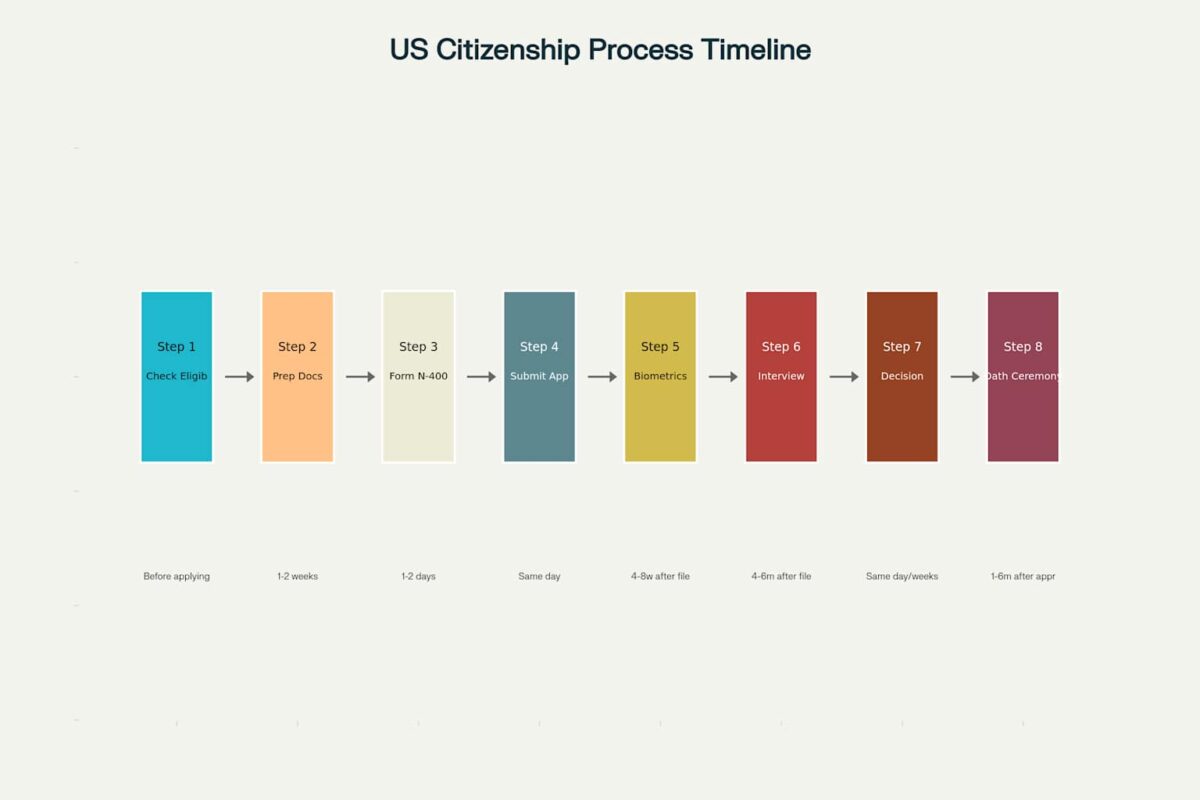
The US citizenship process involves 8 key steps from eligibility check to oath ceremony, typically taking 5-6 months after application submission
Step 1: Check Your Eligibility (Before Applying)
Before starting your application, ensure you meet these basic requirements:
Age and Residency Requirements:
- At least 18 years old
- Lawful Permanent Resident for at least 5 years (or 3 years if married to US citizen)
- Physically present in the US for at least 30 months out of the last 5 years
- Continuous residence in the US for 5 years (or 3 years)
- Resident of the state where you’re applying for at least 3 months
Character Requirements:
- Good moral character for the required period
- Attachment to principles of the US Constitution
- No disqualifying criminal history
- Current on tax obligations
📝 Quick Eligibility Checklist:
- I have been a Permanent Resident for the required time
- I have lived in the US for the required physical presence period
- I have no serious criminal convictions
- I have filed my taxes as required
- I can speak, read, and write basic English
- I am willing to take the Oath of Allegiance
Step 2: Prepare Your Documents (1-2 weeks)
Gathering the right documents is crucial for a smooth application process. Missing or incorrect documents are the leading cause of delays.
Essential Documents Checklist:
| Category | Documents |
|---|---|
| Identity | – Green Card (both sides) – Driver’s License – Passport (all pages) |
| Residency | – Tax returns (5 years) – Employment letters – Rental agreements/mortgage documents |
| Marriage (if applicable) | – Marriage certificate – Spouse’s citizenship proof – Joint financial documents |
| Character | – Police certificates (if required) – Court dispositions (if arrests) – Military records (if applicable) |
| Photos | – 2 passport-style photos (if outside US) – USCIS will take photo at biometrics appointment |
Identity Documents:
- Photocopy of both sides of your Green Card
- Driver’s license or state ID
- All passports (current and expired) with relevant pages
Residency Proof:
- Tax returns or transcripts for the past 5 years (3 if married to citizen)
- Employment authorization documents
- Rental agreements, mortgage documents, or utility bills
Marriage-Related Documents (if applicable):
- Current marriage certificate
- Proof of spouse’s US citizenship
- Divorce decrees from previous marriages
- Joint financial documents (bank statements, tax returns)
Character Evidence:
- Police certificates from countries where you lived 6+ months
- Court dispositions for any arrests
- Military records (if applicable)
💡 Pro Tip: Start gathering documents early. Some international police certificates can take months to obtain.
Step 3: Complete Form N-400 (1-2 days)
The Application for Naturalization (Form N-400) is the heart of your citizenship application. This 20-page form covers your background, travel history, and eligibility.
Key Sections to Focus On:
- Part 2: Information about your eligibility
- Part 6: Information about your residence and employment
- Part 7: Time outside the United States
- Part 8: Information about your marital history
- Part 9: Information about your children
- Part 10: Additional questions (criminal history, selective service, etc.)
Common Form N-400 Mistakes to Avoid:
- Leaving any fields blank (write “N/A” if not applicable)
- Inconsistent dates or information
- Failing to disclose all travel outside the US
- Not reporting name changes or aliases
- Incorrect math on physical presence calculations
Step 4: Submit Your Application (Same Day)
You can file Form N-400 online through your USCIS account or by mail. Online filing is recommended as it’s faster and $50 cheaper.
Filing Options:
- Online: $710 + faster processing + automatic receipts
- Paper: $760 + slower processing + potential mail delays
Payment Methods:
- Credit/debit card (online)
- Check or money order (paper filing)
- Form G-1450 for credit card payment with paper filing
After Submission:
- You’ll receive a receipt notice with your case number
- Use this number to track your case status online
- Keep the receipt notice safe – you’ll need it for your interview
Step 5: Biometrics Appointment (4-8 weeks after filing)
USCIS will schedule you for biometrics services to capture your fingerprints, photograph, and signature for background checks.
What to Expect:
- Appointment notice will arrive by mail
- Bring your appointment notice and a valid photo ID
- The appointment typically takes 15-30 minutes
- You cannot reschedule online – call USCIS if needed
Background Check Process:
- FBI criminal background check
- FBI name check
- Administrative check by US Immigration
Step 6: Interview and Test (4-6 months after filing)
This is the most important step in your citizenship journey. You’ll meet with a USCIS officer who will review your application and administer the citizenship test.
The Interview Process:
- Eligibility Review: Officer reviews your Form N-400 and supporting documents
- English Test: Speaking, reading, and writing in English
- Civics Test: Questions about US history and government
- Decision: Officer will tell you if you passed, failed, or need additional evidence
English Test Components:
- Speaking: Assessed during your interview conversation
- Reading: Read 1-3 sentences correctly about civics/history
- Writing: Write 1-3 sentences correctly about civics/history
Civics Test Details:
- Officer asks up to 10 questions from a list of 100
- You must answer 6 out of 10 correctly to pass
- Questions cover American government, history, and geography
- Study the official 100 questions and answers
📚 Test Preparation Checklist:
- Download the official 100 civics questions and answers
- Study “Learn About the United States” booklet
- Take online practice tests
- Practice English reading and writing with civics vocabulary
- Review your Form N-400 thoroughly
Step 7: Decision (Same day or within weeks)
After your interview, you’ll receive one of three decisions:
Granted: Congratulations! You’ll receive a ceremony notice.
Continued: You need to provide additional evidence or retake a test portion. Common reasons include:
- Failed English or civics test (you can retake)
- Missing documents
- Need for additional evidence
Denied: Your application is rejected. You can appeal or reapply. Common reasons include:
- Failed tests twice
- Eligibility issues discovered
- Criminal history problems
Step 8: Oath Ceremony (1-6 months after approval)
The oath ceremony is the final step where you officially become a US citizen. This is a meaningful celebration of your journey!
What Happens at the Ceremony:
- Check-in and verification of your identity
- Return your Permanent Resident Card
- Take the Oath of Allegiance
- Receive your Certificate of Naturalization
- Sing the national anthem (optional but encouraged)
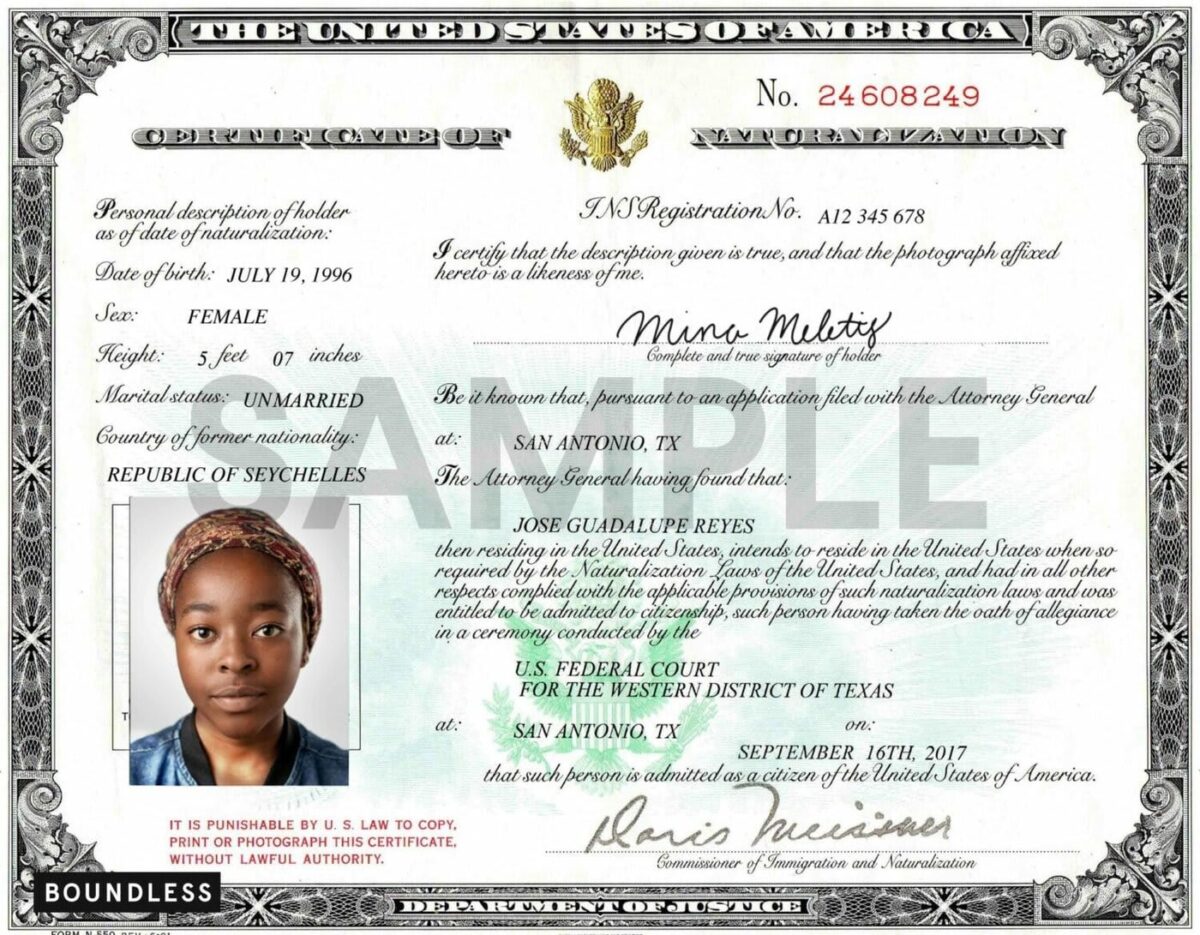
Sample U.S. Certificate of Naturalization showing personal details, photograph, and official certification of U.S. citizenship
The Oath of Allegiance:
“I hereby declare, on oath, that I absolutely and entirely renounce and abjure all allegiance and fidelity to any foreign prince, potentate, state, or sovereignty, of whom or which I have heretofore been a subject or citizen; that I will support and defend the Constitution and laws of the United States of America against all enemies, foreign and domestic; that I will bear true faith and allegiance to the same; that I will bear arms on behalf of the United States when required by the law; that I will perform noncombatant service in the Armed Forces of the United States when required by the law; that I will perform work of national importance under civilian direction when required by the law; and that I take this obligation freely, without any mental reservation or purpose of evasion; so help me God.”
Cost Breakdown: What You’ll Pay
Understanding the costs involved helps you budget for your citizenship journey:
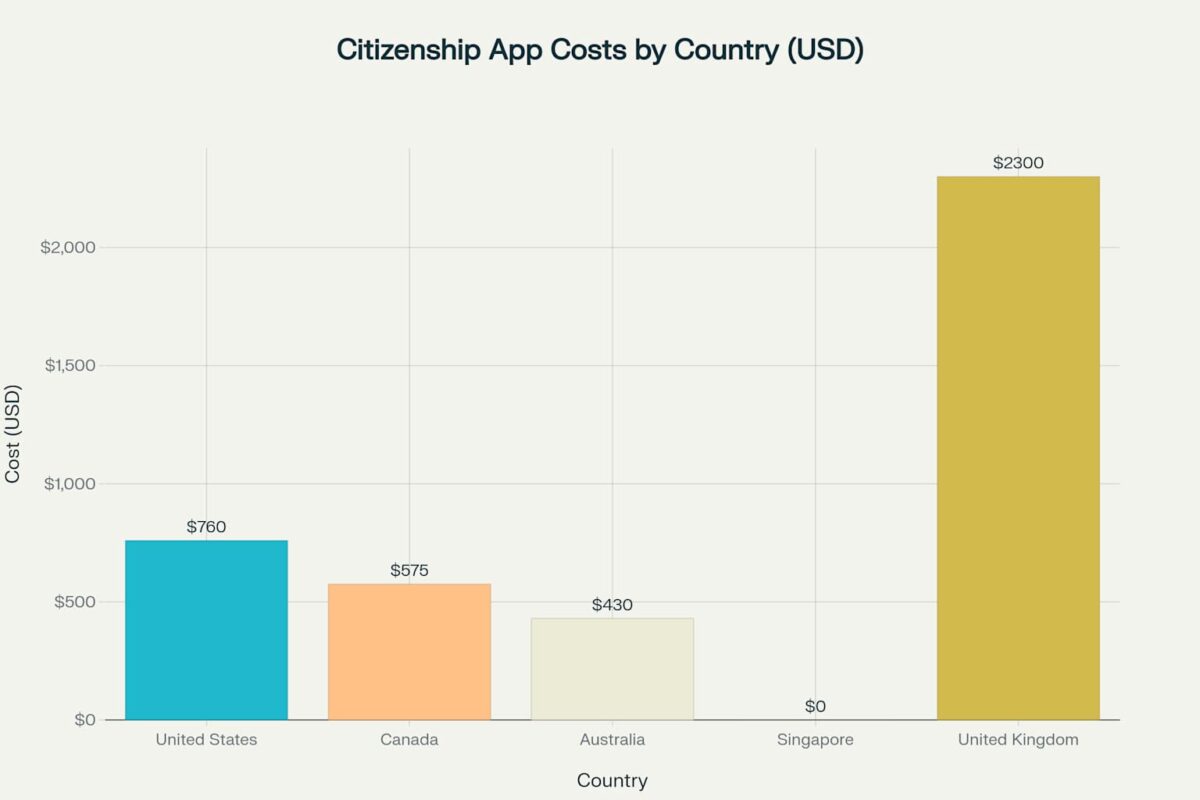
Citizenship application costs vary dramatically by country, with the UK being the most expensive at $2,300 USD and Singapore not publicly disclosing fees
US Citizenship Costs (2024):
- Application Fee: $710 (online) or $760 (paper)
- No separate biometrics fee (included)
- Document translation costs: $20-50 per document
- Police certificates: $25-100 per country
- Passport application after citizenship: $130-165
Fee Waivers and Reductions:
- Full Waiver: Available if you receive means-tested benefits or income ≤150% of Federal Poverty Guidelines
- Reduced Fee: $380 if income is 150-400% of Federal Poverty Guidelines
- Military: No fee for military service members
Canadian Citizenship Process
Canada offers one of the more streamlined paths to citizenship with shorter residency requirements:

Step-by-step mind map of the Canadian citizenship application process from account creation to final citizenship steps
Key Requirements:
- Permanent resident status
- 3 years (1,095 days) in Canada during the 5 years before applying
- Language proficiency in English or French
- Knowledge of Canada (citizenship test for ages 18-54)
- No serious criminal history
Processing Timeline:
- Application processing: 10 months
- Ceremony scheduling: Additional 2-6 months
- Total time from application: 12-16 months
Australian Citizenship Journey
Australia requires the longest total residency but offers a comprehensive pathway:
Residence Requirements:
- 4 years total residence on valid visas
- 12 months as a permanent resident immediately before applying
- Maximum 12 months absence in the 4-year period
- Maximum 90 days absence in the 12 months before applying
The Australian Citizenship Test:
- 20 multiple-choice questions
- Must score 75% (15/20) overall
- Must answer all 5 Australian values questions correctly
- Based on the “Australian Citizenship: Our Common Bond” study guide
Common Mistakes That Delay or Deny Applications
Learning from others’ mistakes can save you time, money, and frustration:
The Top 6 Citizenship Application Mistakes:
- Applying Too Early
- Problem: Filing before meeting residency requirements
- Solution: Use official calculators and wait until clearly eligible
- Incomplete Documentation
- Problem: Missing required documents causes delays
- Solution: Use official checklists and double-check everything
- Inaccurate Information
- Problem: Errors or omissions can be seen as fraud
- Solution: Be thorough, honest, and review multiple times
- Missing Appointments
- Problem: Failure to appear can result in denial
- Solution: Reschedule properly if needed, arrive early
- Poor Test Preparation
- Problem: Failing tests requires retaking and delays
- Solution: Study official materials, take practice tests
- Wrong Fees
- Problem: Incorrect payment leads to application rejection
- Solution: Check current fee schedules, pay exact amounts
Essential Todo Checklist: Your Citizenship Action Plan
Pre-Application Phase (2-4 weeks before applying)
- Calculate your physical presence using official tools
- Request tax transcripts from tax authority
- Order police certificates from countries where you lived
- Gather all required identity and residency documents
- Take passport photos (if applying from abroad)
- Study for citizenship test using official materials
- Review your travel history and calculate exact days
Application Phase (1-2 weeks)
- Complete Form N-400 carefully and accurately
- Make copies of all documents for your records
- Double-check all information for accuracy
- Calculate total fees required
- Submit application online or by mail
- Save receipt notice and case number
Waiting Phase (During processing)
- Continue studying for citizenship test
- Keep address updated with immigration authorities
- Respond promptly to any requests for additional evidence
- Track case status online regularly
- Maintain good moral character (no legal troubles)
Pre-Interview Phase (2-4 weeks before interview)
- Review your Form N-400 thoroughly
- Practice English reading and writing
- Take practice civics tests until consistently passing
- Prepare required documents for interview
- Plan your route to the interview location
Interview Day
- Arrive 30 minutes early
- Bring appointment notice and valid photo ID
- Bring original documents and copies
- Stay calm and answer honestly
- Ask for clarification if you don’t understand a question
Post-Approval
- Attend oath ceremony as scheduled
- Return Permanent Resident Card at ceremony
- Apply for passport immediately after ceremony
- Update voter registration
- Inform employer of citizenship status change
Test Preparation: Keys to Success
English Test Tips
- Speaking: Practice everyday conversations, pronunciation, and vocabulary
- Reading: Focus on civics and history vocabulary, practice reading aloud
- Writing: Practice writing sentences with proper grammar and spelling
Civics Test Strategy
- Study the official 100 questions and answers
- Focus on themes: government principles, rule of law, geography, symbols, holidays
- Use flashcards and online practice tests
- Understand concepts, don’t just memorize answers
Sample Civics Questions:
- What is the supreme law of the land? (The Constitution)
- How many U.S. Senators are there? (100)
- Who wrote the Declaration of Independence? (Thomas Jefferson)
- What ocean is on the West Coast of the United States? (Pacific)
Timeline Expectations: When Will You Become a Citizen?
Typical US Timeline:
- Preparation: 2-4 weeks
- Application to Interview: 4-6 months
- Interview to Ceremony: 1-6 months
- Total from application: 5.5 months average
Factors That Can Extend Timeline:
- Incomplete applications
- Need for additional evidence
- Failed tests requiring retakes
- High volume at local offices
- Complex background checks
After Citizenship: Your New Rights and Responsibilities
Once you become a citizen, your life changes in several important ways:
Immediate Next Steps:
- Apply for Passport: Do this immediately – you’ll need it for international travel
- Register to Vote: Exercise your new democratic rights
- Update Employment Records: Inform your employer of your new status
- Consider Dual Citizenship: Understand your birth country’s policies
New Civic Duties:
- Jury Duty: You may be called to serve on juries
- Voting: Participate in local, state, and federal elections
- Taxes: Continue filing taxes regardless of where you live
- Selective Service: Males 18-25 must register (if not already done)
Travel Considerations:
- Use your new passport for all international travel
- Some countries may require visas that weren’t needed with your previous passport
- Consular services are available if you need help abroad
Special Situations and Considerations
Military Service Members
- No filing fees
- Expedited processing available
- Special eligibility rules for overseas service
- Can apply while stationed abroad
Spouses of US Citizens
- 3-year residency requirement instead of 5
- Must be married to and living with citizen for 3 years
- Additional documentation required
- Joint tax returns helpful
Children and Derivatives
- Children under 18 may derive citizenship automatically
- Different rules for adopted children
- Special provisions for children of military members
Conclusion: Your Journey to Citizenship
Becoming a citizen is one of the most significant milestones in your immigration journey. While the process can seem overwhelming, breaking it down into manageable steps makes it achievable for anyone willing to put in the effort.
Key Takeaways:
- Start Early: Begin gathering documents and studying well before you’re eligible
- Be Thorough: Accuracy and completeness are crucial for success
- Stay Informed: Immigration laws and procedures can change
- Get Help: Consider working with qualified immigration attorneys for complex situations
- Be Patient: The process takes time, but the result is worth the wait
Final Reminders:
- Keep copies of everything
- Respond promptly to all government communications
- Maintain your permanent resident status throughout the process
- Continue meeting all tax and legal obligations
- Celebrate this amazing achievement when you take your oath!
Your citizenship journey represents not just a legal status change, but a commitment to your new country and community. Welcome to this exciting next chapter of your life!
Resources for Continued Learning:
- Official government websites for current forms and fees
- Community citizenship classes and study groups
- Online practice tests and study materials
- Legal aid organizations for assistance
- Immigrant support organizations in your area
Remember: Every citizen was once where you are now. You can do this!


